Test Cases Cockpit
Overview
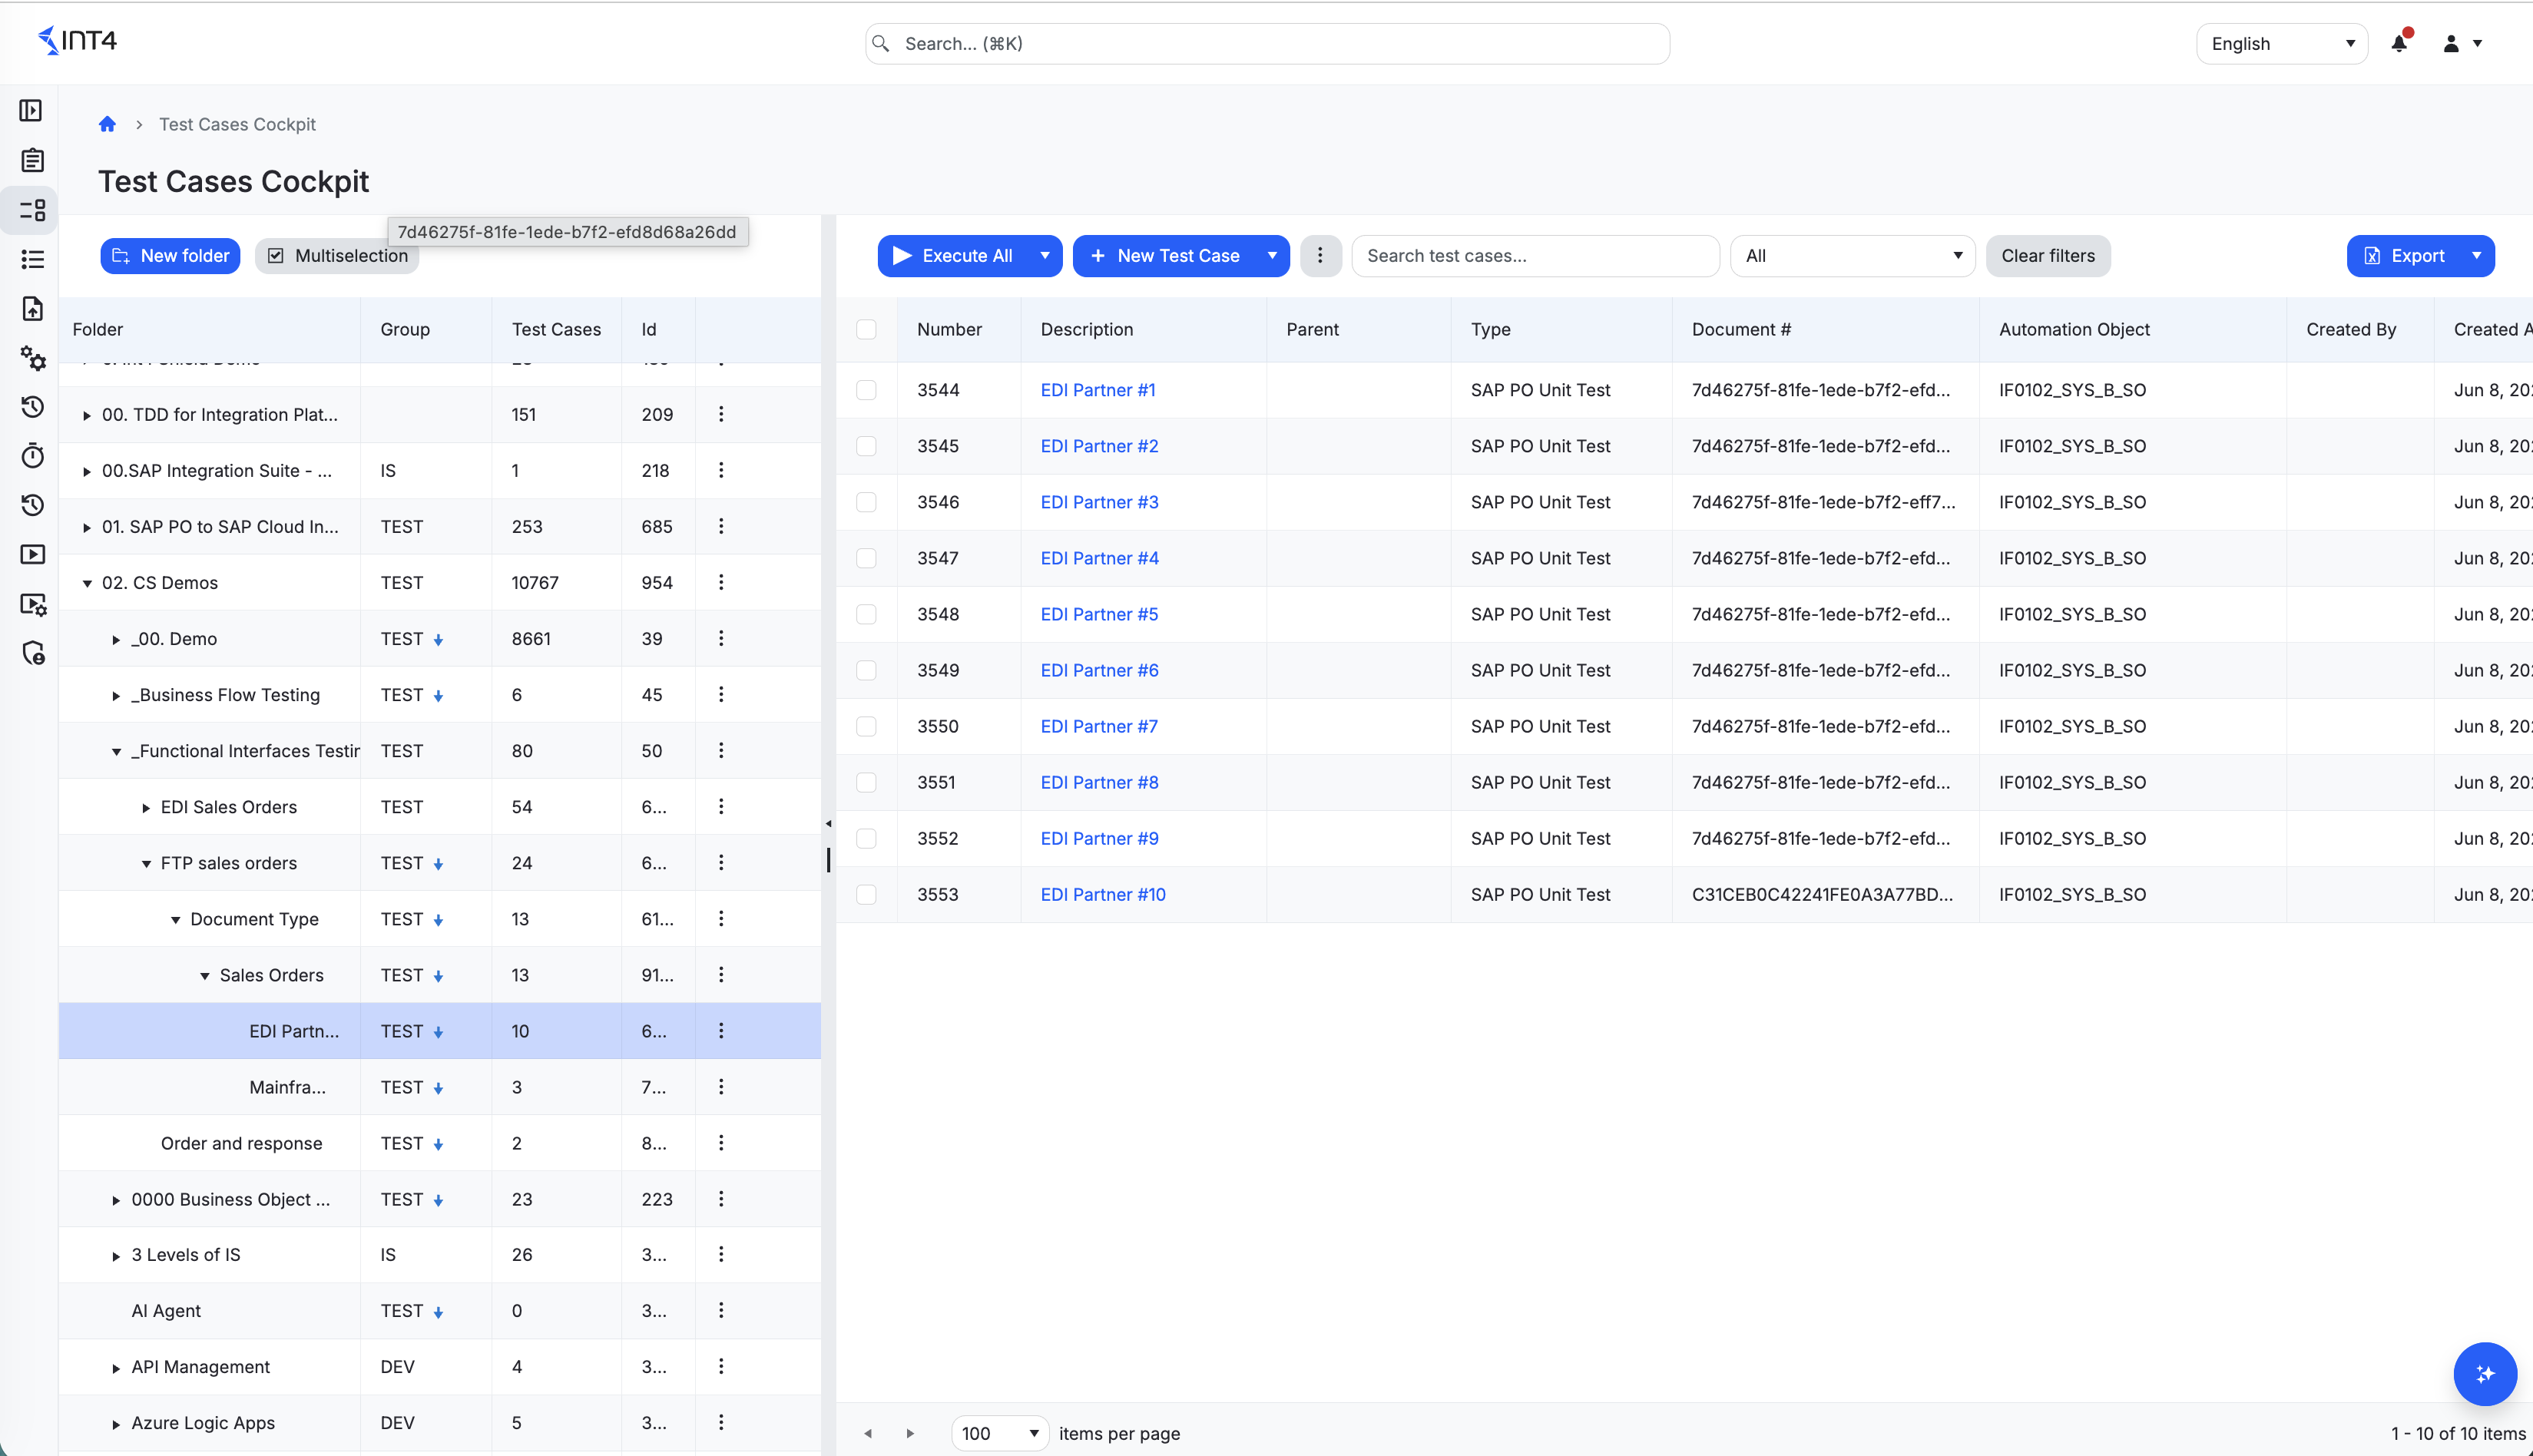
The Test Cases Cockpit is the main workspace for working with test cases. It combines a folder tree on the left with a test case list — or, when you open a single test case, the detail editor — on the right, so you can browse, create, edit, copy, delete, and run test cases without leaving the page.
The folder tree is the organising structure for every test case in the product. A test case lives in exactly one folder, and the folder it lives in determines two things you cannot set on the test case itself: the project scope (who is allowed to see and act on it) and the default Group (which connected systems it talks to when payloads are fetched or runs are executed). Folders can declare their own values for these or inherit them from a parent folder.
Test cases are versioned. Every time you save changes, a new version is written and the previous one is kept as history, so you can review what an earlier version looked like, restore it, or audit who changed what and when. The active version is the one you see on the detail page by default.
A test case captures what to test (a target document on a source system, identified by a document number, scoped to an automation object that describes the flow) and the messages used in the test (the source payload plus the expected response). When you create a test case with a document number and no manually attached messages, the system queues an asynchronous job that fetches the payload from the connected source system; you see its progress on the test case while it runs.
Think of a test case as the data for one execution, and the automation object as the reusable configuration it runs against. The automation object describes how the flow is sent, retrieved, and compared, so one automation object can be shared across many test cases; each test case adds only the specific document and payloads for its own run. This is why the document number matters: supplying it is what lets the platform fetch the captured source document and expected response from the system, instead of you attaching every file by hand. The expected payload is the reference — the "before" you captured when the test case was created — and every run produces a fresh "after" that is compared back against it. That single comparison is what makes the same test case useful for regression (re-running the same flow to confirm nothing broke), for migration (capturing on one platform and re-running on its replacement), and for verifying a change before you ship it.
Grouping test cases under a Parent test case turns a set of related steps into a scenario — a multi-step business flow such as an order-to-cash chain, where each step's result feeds the next. The parent acts as the umbrella header, and running it runs the whole sequence in order.
The screen also offers selection-based bulk actions: you can run several test cases at once (with or without execution parameters), migrate them to a different platform type, and select multiple folders at the same time to operate on their combined contents.
Tasks
How to find a test case by folder
- Open the cockpit from the navigation under Test Cases → Cockpit.
- In the tree on the left, click a folder. The right pane shows the test cases that live directly in that folder.
- To narrow the list further, use Search test cases... at the top of the list, or the type filter next to it. The search matches the test case number, the document number, and the description. Clear filters resets both at once.
- If the list is empty, the panel shows No test cases found. With no folder selected, it shows Please select a folder to view test cases instead.
The list is ordered hierarchically: a parent test case appears immediately above its children, and siblings are ordered by number. Your search text, type filter, and page position are kept in the page URL, so the filtered view survives a refresh and can be shared as a link. Picking a different folder starts a fresh view and clears them.
The split between the tree and the list is resizable, and so are the folder tree's columns; the tree pane can also be collapsed. Your size and collapsed state are remembered between visits.
How to view test cases from several folders at once
- In the folder tree toolbar, click Multiselection. Checkboxes appear next to each folder.
- Tick every folder whose test cases you want to see. The list on the right combines test cases from all ticked folders, including their subfolders.
- The count in the Multiselection button shows how many folders are ticked.
- To return to single-folder browsing, click the toolbar button again.
The list of ticked folders is preserved in the page URL, so the view is shareable and survives a browser refresh.
How to create a folder
- Select the folder you want the new one to live under, or leave nothing selected to create a root folder.
- In the folder tree toolbar click New folder.
- Fill in Name, and optionally set Group and Project scope. For each of these two, you can either inherit from the parent or declare a value directly on this folder.
- Click Create.
Folders are organisational, but they are also the inheritance source for project scope and the default group of connected systems. Moving a folder later — even just dragging it under a different parent in the edit dialog — re-scopes everything beneath it.
How to edit, delete, or audit a folder
In the tree, hover the folder row to reveal the Folder actions menu, then choose:
- Edit Details — change name, parent, group, or project scope.
- Add subfolder — same as creating from the toolbar but pre-fills the parent.
- Audit Log — review who changed what on this folder and when.
- Delete — remove the folder. The folder must have no subfolders and no test cases; the delete dialog tells you which is blocking the operation.
How to create a new test case
You can create a test case in two ways: by pulling test data (selecting a real message from a connected source platform) or manually entering the fields. Which paths are available depends on your license — see Tips & edge cases.
To create a test case manually:
- Pick a folder in the tree on the left.
- In the list toolbar click New Test Case. The detail editor opens in create mode.
- Fill in Document Number, the automation object, the description, and optionally a Parent test case and pinned source and execution groups of systems.
- Click Save in the top bar. The system creates the test case as version 1 and, if you provided a document number, queues a background job to fetch the payload from the source system.
To create from a platform message:
- Pick the target folder.
- Open the New Test Case dropdown next to the button and choose Pull test data. The Message Selector dialog opens.
- Under Basic, pick the Automation Object. The rest of the dialog adapts to the automation object's test type — see How message selection differs by test type below. For SAP platform types, also pick the System under test and the From Date/Time / To Date/Time time window; for business-object types, pick the group of connected systems to query instead.
- Optionally narrow the result with the type-specific fields under Filters, then click Query.
- In the result list, tick the messages you want. You can inspect a message's raw payload first with Preview Payload, which opens the Payload Preview window.
- Optionally enter a Description to be applied to the new test cases, then click Confirm Selection. Each selected message becomes a pending row at the top of the test case list, highlighted in green.
- Optionally edit each pending row's description and other fields by clicking it.
- When the pending rows match what you want, click Save (
count) in the list toolbar to persist them. Click Cancel to throw them away instead.
If you click New Test Case without a folder selected, the button is disabled and its tooltip explains Select a folder first.
How to group test cases under a parent test case
- Open the test case that should become a child, and click Edit.
- In Parent test case, pick the test case that should act as the umbrella (for example, the scenario header of a regression suite). The choice always refers to the other test case as a whole, not to one of its versions.
- Click Save Changes.
In the test case list, children are shown directly beneath their parent, and the Parent column links back to the parent. To detach a child, clear the Parent test case field and save. The system rejects choices that would create a loop (a test case cannot be its own ancestor), chains deeper than 50 levels, and archived test cases as parents.
How to open and read a test case
Click a test case description in the list. The detail page replaces the test case list in the right pane. Navigation is broken into sections you can scroll between using the sidebar on the right:
- General — the core fields of the test case.
- Messages — source and expected messages attached to this version.
- Variables — runtime variables resolved when the test runs.
- Admin — who created and last changed the test case, plus the full change history.
- Versions — every saved version of this test case.
Use the Back button in the top bar to return to the test case list with your previously selected folder still in view.
How to edit a test case
- Open the test case.
- In the top bar click Edit. The page reloads in edit mode with a coloured banner showing Editing mode.
- Change any of the fields under General, Messages, or Variables.
- Click Save Changes. The system writes a new version and switches back to view mode showing the new version. The previous version is preserved and visible under Versions.
- To abandon your changes click Cancel.
Editing the messages of a test case (adding, replacing, removing, or changing part content) is a separately licensed capability — see Tips & edge cases.
How to copy a test case
- Open the test case.
- In the top bar click Copy. The detail page opens in create mode pre-filled with the original's folder, description (suffixed with
_COPY), document number, automation object, and group pins. - Adjust anything you want to differ on the copy, then click Save.
How to delete or archive a test case
- Open the test case.
- Click Delete in the top bar.
- In the Delete Test Case dialog, confirm with Delete.
What happens next depends on whether the test case has ever been run:
- No execution history — the test case and all its versions are removed permanently. The success message reads Test case deleted successfully.
- Execution history exists — the test case is archived instead, so past test run results stay intact. The message then reads Test case has execution history and was archived instead of deleted. An archived test case disappears from the cockpit list but stays reachable through links from old test runs; it is read-only — editing, restoring a version, or choosing it as a parent is refused. There is currently no way to un-archive it.
Deleting is refused while other (non-archived) test cases still name this one as their Parent test case — delete or detach the children first; the error message lists which test cases are blocking. In every case the test case's sequential number is never reused.
How to view and restore a previous version
- Open the test case and scroll to Versions in the right sidebar.
- The grid lists every saved version with Version, Description, Created By, and Created At. The currently active row is marked Current.
- Click any non-current version number to open it. The page enters a read-only "historical view" mode with a banner.
- To bring that historical version back, click Restore This Version, then confirm. The system writes a new version whose contents match the historical one; the version pointer moves to that new version. The original history is preserved.
- Click Back to Current Version to return to the active version without restoring.
How to run a test case
From the detail page:
- Open the test case.
- In the top bar, click the main Execute button to run it immediately with default settings, or open its dropdown and choose Execute w/ Parameters to set the run name, group, iteration count, scheduling, and other options before starting.
From the list:
- Tick the rows you want to run, or leave nothing selected to run everything currently scoped by the selected folder(s) and filters.
- Click the main button — labelled Execute (
countselected) when rows are ticked or Execute All otherwise — to run immediately, or its dropdown to run with parameters.
A success message links to the new test run. From there you can monitor results and read logs.
How to migrate test cases to another platform type
Migration lets you re-create a set of test cases against a different automation object and target type (for example, moving a SAP PO test case to SAP Integration Suite).
- In the list, tick the test cases to migrate.
- Open the (unlocalised: more-actions menu icon — the kebab/three-dots button in the test case list toolbar has no i18n key today) dropdown and choose Migrate Selected (
count). - In the dialog choose the target Folder, Test Type, and Automation Object.
- Click Migrate (
count). The result message tells you how many succeeded and how many failed.
Migration is only available when the selected test cases all have the same source type.
How to export the test case list
In the top right of the list toolbar use the Export button to export the visible test cases. The dropdown offers Export to Excel and Export to PDF.
How to watch a payload fetch finish
When a test case is created or updated with a document number, the system queues a background fetch against the source system. While that job runs, a status strip appears on the detail page above the form. It refreshes itself in real time via a live connection to the server and shows whether the job is pending, running, completed, failed, or returned no payload. You can also refresh it manually with Refresh status.
If the job fails, the strip shows the error from the source system; you can fix the underlying cause (for example, the connected source system, the document number, or the automation object) and re-trigger by saving again.
How message selection differs by test type
The Message Selector adapts to the test type of the automation object you pick. The type decides where messages are looked up and which filters make sense:
- SAP platform types (SAP Integration Suite inbound/outbound/micro unit tests, SAP PO unit/outbound/synchronous tests) query the message monitor of one connected system. You pick the System under test and a From Date/Time / To Date/Time window, and refine under Filters with platform fields — integration flow, status, correlation/application ID on SAP Integration Suite; interface name/namespace, sender, receiver, and status on SAP PO. Results show the message identifier plus platform columns, and each row can be opened in the Payload Preview window.
- Business-object types query a list action defined on the business object instead of a message monitor. There is no single connected system and no time window: you pick the (unlocalised: SUT Group (active environment) —
messageSelector.sutGrouphas no key inconfig.jsonyet) to run the lookup against, and the Filters section shows the business object's own dynamic parameters (the labels come from the business object definition, not from the product). Results are a simple list of document numbers with timestamps; the payload preview works here too and uses the same group of systems. - Types without message selection (file comparators, database comparators) do not offer Pull test data at all — test cases for these types are created manually and their messages attached by hand.
Field reference
General fields on a test case
| Field | Description |
|---|---|
| Number | Sequential, gap-free, system-assigned identifier shown as TC #N in the UI. Allocated when the test case is first created. Cannot be reused after deletion. |
| Version | The active version number of the test case. Each save increments it; the previous version is kept as history. |
(unlocalised: folder — folder_id is rendered through MetadataField with no explicit i18n key in testCase.json; the label comes from generated metadata) | The folder this test case lives in. Determines who can see and act on it (project scope) and the default group of connected systems used at fetch/run time. Moving the test case to another folder may re-scope it. |
| (unlocalised: description — same as above) | Short label (up to 100 characters). Required. |
| (unlocalised: automation_object_id — same as above) | The automation object that describes the shape of this test: which message roles it has, which kind of source system it talks to, and how its payload is fetched. Test cases always follow the automation object's current version, independently of the test case's own versioning. |
| Parent test case | Optional reference to another test case that acts as the umbrella for this one (for example, a scenario header grouping its steps). Always points at the other test case as a whole, never at a specific version. The system rejects loops, chains deeper than 50 levels, and archived test cases. |
| Document Number | The identifier of the target document on the source system. When set, the system fetches the payload for that document asynchronously after creation. The button next to the field opens the Select from Messages dialog so you can pick the document from a live list of messages on the connected source system. Disabled until an automation object is chosen — the tooltip then reads Select an Automation Object first. |
| Type | The platform/type derived from the automation object (for example, SAP PO, SAP Integration Suite). Read-only. |
| (unlocalised: source_group_id — rendered through MetadataField with no explicit i18n key; label comes from generated metadata) | An optional pinned group of connected systems to fetch payloads from. Overrides the group inherited from the folder. Leave unset to inherit. |
| (unlocalised: execution_group_id — same as above) | An optional pinned group of connected systems to run the test against. Overrides the group inherited from the folder. Leave unset to inherit. |
| (unlocalised: origin_sut_name — same as above) | The connected system that the original payload was actually fetched from. Set once at creation by walking the resolution rules and stored for provenance. Read-only and not recomputed if you later change the folder or the execution group. |
Columns shown in the test case list
| Column | Description |
|---|---|
| Number | The sequential number identifying the test case. |
| Description | The description you gave the test case. Clicking it opens the detail page. |
| Parent | The parent test case, when one is set. Clicking it opens the parent's detail page. |
| Type | The platform type derived from the automation object. |
| Document # | The document identifier on the source system, if set. |
| Automation Object | The automation object the test case is bound to. |
| Created By | The user who created the test case. |
| Created At | When the test case was created, shown relative to now. |
Tips & edge cases
- The automation object is shared configuration; the test case is the data. The automation object decides how the flow is sent, retrieved, and compared, and it is meant to be reused across many test cases. A test case carries only its own document number and payloads. That is why changing the automation object affects every test case bound to it, and why the test case always follows the automation object's current version.
- The expected payload is your baseline. What you capture as the expected response is the fixed "before"; every run compares the platform's fresh result against it. Keeping that baseline stable is what makes results meaningful across regression, migration, and pre-release checks — so re-capturing it changes what "passing" means.
- Parent–child links describe a business flow. Grouping test cases under a parent builds a scenario that runs as an ordered sequence (for example, an order-to-cash chain where each step depends on the one before it). That is why children are kept directly beneath their parent in the list and why the parent runs first.
- Project scope and connected systems come from the folder, not from the test case. Moving a test case (by editing its folder) can change who is allowed to see it and which connected systems it talks to. There is no separate scope or system selector on the test case itself except for the optional source/execution group pins, which only override the folder defaults.
- Editing always produces a new version. Even saving with no changes writes a new version. Versions are never overwritten — the previous one stays in the history.
- Restoring a version does not roll the pointer back. Restoring writes a fresh version whose contents mirror the chosen historical one. The history grows; nothing is lost.
- "Delete" can mean "archive". A test case that has ever been executed is archived rather than removed, so test run history keeps working. Archived test cases vanish from the cockpit list, are read-only, cannot serve as parents, and cannot currently be un-archived — but deep links from old test runs still open them.
- A parent cannot be deleted while it has active children. Detach or delete the children first; the error message names the blocking test cases.
- Moving a test case under a new parent reorders the whole family. The hierarchical ordering in the list updates for the test case and everything beneath it.
- Pulling test data from the platform may be your only creation path. If your license does not include the manual creation feature, the plain New Test Case button only opens the message selector. The tooltip then reads Manual test case creation is not available with your license. Test cases must be created from platform messages..
- A test case cannot be created without an effective connected system if its automation object requires one. The system will attempt to resolve a target by checking the pinned execution group, then the folder's inherited group, then — if exactly one matching system exists in the whole installation — that one. If the resolution finds nothing or finds more than one candidate, the save fails with a clear message.
- Multi-folder selection always includes subfolders. Ticking a folder in multiselection mode adds every test case beneath it. Single-folder browsing shows only the direct children of the selected folder.
- The pending-rows highlight is local to your browser. Pulled test cases that have not yet been saved are kept only in your browser session. Closing the page before clicking Save (
count) loses them. - The folder tree is eventually consistent after structural edits. When you move or re-scope a folder, the test case list may take a few seconds to reflect inherited changes for descendants. A live update notification refreshes the tree automatically when the recomputation finishes.
- Migration is only available across types that have a defined migration path. If the selected test cases are of mixed types, or of a type with no migration path defined, the dialog shows No migration paths available for the selected test case type.
Related features
Prerequisites & permissions
To work in the cockpit you need at least the Test Case: Read permission on the project scope of the folders you want to browse. Without it the list stays empty for those scopes.
Creating folders requires Folder: Write on the target scope. The toolbar's New folder button is disabled when you lack this permission.
Creating a test case requires Test Case: Write on the target folder's scope, Folder: Write on that same folder, and Automation Object: Read on the automation object's scope. The system checks all three before persisting.
Editing or reverting requires Test Case: Write on the test case's current scope. Deleting requires Test Case: Delete. Running requires Test Case: Execute plus the corresponding permissions on the resolved connected system and on the automation object.
When you lack a permission, the corresponding button in the top bar of the detail page is disabled rather than hidden. The list-level Execute action is similarly disabled if you lack Test Case: Execute.
About permissions. Int4 Suite controls what you can see and do through roles and permission groups assigned to your user. Each role grants permissions on a specific resource (for example, Test Case, Automation Object, System Under Test) at one of four levels: Read, Write, Delete, or Execute. Some permissions are further narrowed by project scope, so you may have access to one part of the system but not another.
If a button is disabled or a list comes back empty, missing permissions are the most likely cause. Ask an administrator to review your role assignments, or check IAM → Users if you have the User: Read permission.